Saturday, August 31, 2013

Cozy Custom Cards

This is a home based business created by my friend Elaine and her friend Joan. They make some awesome Cozy Custom Cards...check them out. They even offer a mailing service!


We at Cozy Custom Cards are dedicated to providing quality and service for all of your card-giving occasions.  When you order your card, you can request a customized greeting, a Braille message, and if you give us the name and address of the recipient, we'll even sign and mail it for you.  Look in the Specials tab for information about our subscription mailing service.


All Cozy Custom Cards are hand-crafted on heavy card stock with lots of tactile features to delight the hand as well as the eye. Cards are 4 1/4 by 5 inches. 


Ten percent of our proceeds go to support the Oklahoma Council of the Blind.​


Check this space often!  http://www.cozycustomcards.com/
Ask about our mailing service.  We offer two options:
1.  Order a card, or a whole year's worth of cards, and we will send appropriate cards to you in time for you to sign and mail them to the recipients
2.  Give us a list of names, addresses, and birth dates, and we will sign and mail them out for you.


Elaine was an art major in college and now works full-time as a rehabilitation teacher for the blind.  As a legally blind person herself, she enjoys numerous hobbies such as books on tape, narrated movies, and stamping cards.  Elaine is the creative force behind Cozy Custom Cards, as well as a relentless producer of colorful, tactile cards.  Her husband, Jay, provides the Braille messages when requested.


Joan is the "eyes" of Cozy Custom Cards.  As a sighted person, Joan is able to handle the activities that require vision, such as helping to match colors and make sure lines are straight.  She works days as a vocational rehabilitation counselor for the deaf-blind, and spends her spare time learning and practicing new card making techniques.

Friday, August 30, 2013

Friday Foto

My son was smart to get Vanessa a new grill for her birthday!
She has become a grill master on that thing! 
Lots of good family time can be spent around a grill.


Thursday, August 29, 2013

Ann's Chicken Fry House Route 66 OKC

Ann's Chicken Fry House on Historic Route 66 in Oklahoma City, Oklahoma at the corner of 39th and Tulsa, gets a big thumbs up from us. Yummy home cooked meals in a tiny old type diner place. Just remember to take cash, because they do not take cards or checks! Look for the pink Cadillac and the Dodge patrol car out front. 


Wednesday, August 28, 2013

Bierrocks


Bierrocks

(when you're ready to get in touch with your inner German)

...

Original recipe makes 1 1/2 dozen

2 (8 ounce) cans refrigerated dinner roll dough

1 pound lean ground beef

1 pound pork sausage

5 cups shredded cabbage

1 cup chopped onion

1/2 teaspoon salt

1/2 cup butter, melted 


 Directions
1. Roll out dough to 1/4 inch in thickness, then cut into 5 inch squares.
2. In a large skillet, cook beef and sausage over medium heat until browned; make sure there is no remaining pink color. Stir in cabbage, onions and salt with meat. Sauté for about 20 minutes. Turn down heat to warm.
3. Fill each dough square with a tablespoon of meat filling. Seal dough by bringing the four corners up and then overlapping them. Place pastry upside down on a baking sheet; brush each roll with melted butter.
4. Allow rolls to rise for 1 hour and then bake in a preheated 350 degrees oven for 25 minutes.

Tuesday, August 27, 2013

Diabetes Tattoos

This appeared on Facebook and then a couple of other people posted their tattoo photos, so instead of seven there are nine. I always caution anyone thinking about getting tats that the majority of employers will not hire those with tattoos showing. I know in this day and age that is a little crazy, but it is a fact. So think before you decide to add art to your body! It is like real estate....location, location, location!


Monday, August 26, 2013

Cover Text Books

I have used wallpaper samples, fabric, paper bags, recycled gift bags, wrapping paper and all sorts of things to cover text books over the years. I found this neat article in my e-mail about covering text books I wanted to share with you. I love their newsletter and recommend you sign up to receive it too. http://www.homemadesimple.com/

Covering textbooks is a back-to-school tradition, protecting them from damage and creating a unique statement. Use our cover ideas to turn books into one-of-a-kind pieces of self-expression.
 

Paper Bag Book Cover

Turn easy-to-find, simple-to-fold paper bags into a book cover, then dress it up in fun ways.
MATERIALS
Large brown
grocery bag
Textbook
Scissors
Tape

INSTRUCTIONS
  1. Open grocery bag along seams and flatten, with printed side facing up.
  2. Fold top edge of bag down 2” from top. Line up top of textbook along folded edge.
  3. Crease bottom edge of bag against the bottom of the textbook to make a guideline.
  4. Cut bag about 2” from the guideline, then fold up to the bottom edge of textbook.
  5. Close the book cover over the book, leaving about 3” on each edge. Fold end over the edge of the slightly opened book cover to make a crease.
  6. Insert one side of book's cover into the folded end of the book cover.
  7. Tape the flap to secure.
  8. Close the book and insert the other side of the book into the cover. Tape to secure.

Sunday, August 25, 2013

Historic Tour of Galveston

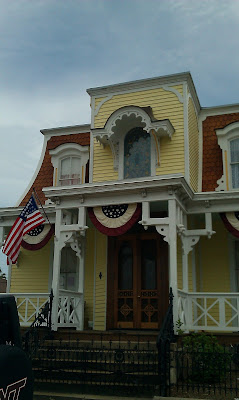
My daughter snapped these photos with her phone as she and friends took the tour of the Galveston Historic District. She snapped this first photo of Miller's Grill, because her last name is Miller. The rest of the photos were taken along the route of the guided tour. This is as close to a tour of Galveston as I will ever get and I thought you might enjoy it with me.


Saturday, August 24, 2013

Money Tree

A money tree is a great gift idea for a wedding, baby shower, graduation party, birthday, or any other event where you want to give a unique gift. I made this money tree by going out in my yard and cutting off a small limb of a tree that had several branches. Then I spray painted it white. Next, I spray painted a gallon can white.
 
After the paint dried I took some bricks and stacked in the can and put the limb down in between the bricks. You have to use something heavy like bricks or rocks in the can so it will not tip over when you put the limb in the can. If you do not have a gallon can you can use a flower pot.
 
Next, I stuffed wadded up paper in the can around the bricks to make it sturdy. Then I put glue on top of the paper and topped with yellow Easter basket grass. I always buy extra Easter basket grass after Easter to use in various craft projects and gift baskets. Then I tied a bow on the can.  
I took the dollar bills and fan folded them. Kind of pinch them in the middle before tying on the tree. After you get them tied on the tree, spread out the ends. I also tied large paper clips on the tree to allow others to put money on the tree at the event.  
This is a fairly inexpensive gift...except the actual money...lol.
It does take a little planning ahead and time to make it, but
it looks impressive when it is done and given to the recipient.